Issuance
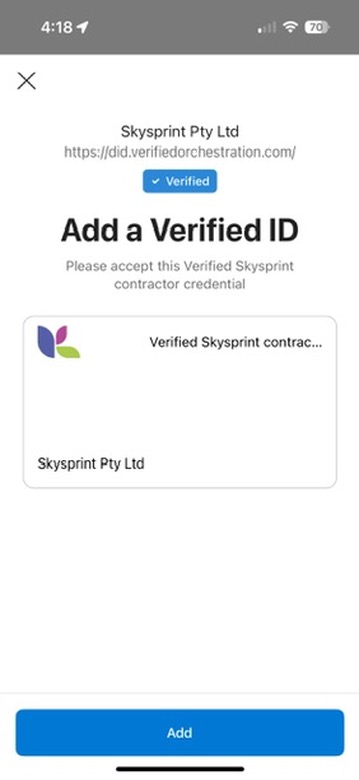
Issuance is the process of adding a credential to the recipient's wallet (Microsoft Authenticator or custom wallet implementation). The recipient can then use the credential to prove claims about themselves to a verifier.
Issuance requires user-interface components to handle several steps and the recipient to be present, to accept the credential. Alternatively, the remote issuance feature supports issuance via email or SMS.
Issuance is a multistep process:
- Create an issuance request
- Display QR code or open link
- Relay PIN to recipient (optional)
- Receive issuance notification


The JavaScript client offers a consolidated issuance function. It can even include capturing a photo of the recipient via the photo capture service for credentials that require a photo.
Create issuance request
To create an issuance request definition and explore the API, use the issuance builder as a starting point.
The issuance request input specifies:
- Which credential will be issued
- The identity to whom the credential will be issued (recipient / issuee)
- Other optional input:
- Values of any claims defined in the contract
- A PIN code that the recipient must enter to retrieve the credential (best sent via a separate channel)
- Callback info, if issuance event data should also be sent to a server-side endpoint
- An expiration date to explicitly control when a credential expires, regardless of when it is issued
- If the credential requires a photo, either:
- A photo of the recipient via the
faceCheckPhotofield - The photo capture request ID via the
photoCaptureRequestIdfield
- A photo of the recipient via the
mutation CreateIssuanceRequest($request: IssuanceRequestInput!) {
  createIssuanceRequest(request: $request) {
    ... on IssuanceResponse {
      requestId
      url
      qrCode
      expiry
    }
    ... on RequestErrorResponse {
      error {
        code
        message
        innererror {
          code
          message
          target
        }
      }
    }
  }
}
{
  "request": {
    "contractId": "<id of the contract to be issued>",
    "identityId": "<id of identity of recipient; or specify via identity field>",
    "includeQRCode": true,
    "callback": {
      "headers": {
        "Authorization": "MySecretTokenToCallMyEndpoint"
      },
      "url": "https://enr3r4d4gvwrb.x.pipedream.net",
      "state": "Any extra state you need to correlate the request with the callback"
    },
    "pin": {
      "value": "1234",
      "length": 4
    },
    "expirationDate": "<explicit expiry date of the credential in ISO format>"
  }
}
{
  "data": {
    "createIssuanceRequest": {
      "requestId": "<request ID>",
      "url": "openid-vc://?request_uri=https://verifiedid.did.msidentity.com/v1.0/tenants/<tenant ID>/verifiableCredentials/issuanceRequests/<request ID>",
      "qrCode": "data:image/png;base64,iVBORw0...<base64 encoded image data>",
      "expiry": 1695285131
    }
  }
}
For each issuance request, the payload size must not exceed the limit of 1 MB as defined by the Microsoft VID service
Display QR code or open link
Once the issuance request is created, it must be opened by Microsoft Authenticator (or custom wallet application) to complete issuance.
The issuance request can be opened in one of two ways:
- On a desktop or web application, display a QR code that the recipient can scan with their mobile device.
- On a mobile application, the URL can be opened directly.
For further info on how to handle presentation links and QR codes, see the wallet link handling guide.
Display QR code
<img src={response.qrCode} alt="Scan this QR code to install your credential" />
Open link on mobile device
if ('error' in response) displayError(response.error)
else if (/Android|iPhone/i.test(navigator.userAgent)) window.location.href = response.url
else displayQrCode(response.qrCode)
Handle issuance received event
Your application can subscribe to issuance events to be notified when the issuance is received by the wallet.
subscription IssuanceEvent($requestId: ID!) {
  issuanceEvent(where: { requestId: $requestId }) {
    event {
      requestStatus
      error {
        code
        message
      }
    }
  }
}
{
  "data": {
    "issuanceEvent": {
      "event": {
        "requestStatus": "request_retrieved"
      }
    }
  }
}
Issuance received events can be received via the IssuanceEvent subscription and the server-side callback, however you cannot poll for issuance received events because they are not stored.
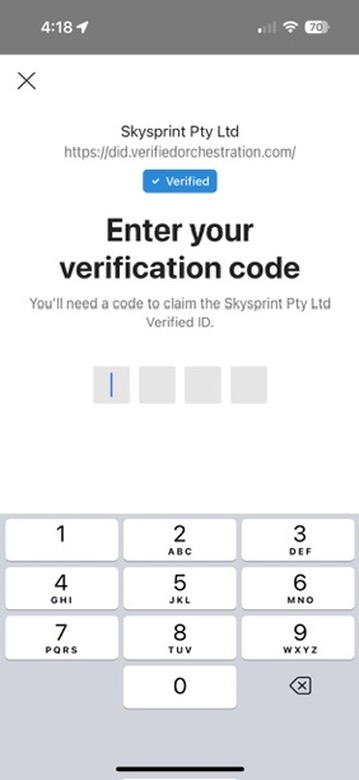
Relay PIN to recipient
Use of a PIN is optional. A PIN can improve the security of issuances to help ensure the credential goes to the intended recipient.
The PIN can be sent to the recipient via a separate channel (e.g. via SMS or email). Doing so can provide a higher level of confidence than displaying the PIN inline.
Alternatively, displaying the PIN after the QR code has been opened may help prevent an unauthorised party scanning a QR code and 'taking' the issuance over the intended recipient's shoulder from a distance without their knowledge.
Microsoft Authenticator will display the PIN entry screen as soon as the QR code is scanned or the link is opened.
You might send the PIN to the recipient via a separate channel at the time you create the issuance request, or wait until the issuance is received by the wallet.
If an invalid PIN is entered, an error event will be returned via the IssuanceEvent subscription and the server-side callback.
{
  "data": {
    "issuanceEvent": {
      "event": {
        "requestStatus": "issuance_error",
        "error": {
          "code": "badOrMissingField",
          "message": "issuance_service_error"
        }
      }
    }
  }
}
Receive issuance notification
Upon successful issuance, the issuing application can receive data by any combination of:
- Subscription to the issuance event
- Polling for issuance data
- Server-side callback
{
  "data": {
    "issuanceEvent": {
      "event": {
        "requestStatus": "issuance_successful",
        "error": null
      }
    }
  }
}
For complete code samples of different methods of receiving issuance events, view the issuance samples for your development stack.
Issuance with photo
If the credential requires a photo of the recipient, the photo must be supplied one of two ways:
- directly supplying a base64 encoded photo in the
faceCheckPhotofield - using the photo capture service to capture a photo of the recipient and supplying the
photoCaptureRequestIdfield
Photo capture service
The photo capture service allows you to generate a URL for the recipient to use to capture a photo. The URL can be opened in a browser or on a mobile device, and the recipient can capture a photo of themselves. Once complete, the photo capture request ID can be included in the issuance request.
This allows issuing applications to request a photo of the recipient without needing to implement a photo capture mechanism or require access to recipient photos.
Since the photo capture is specific to the issuee, the issuee identityId must be provided in the photo capture request but can be omitted from the presentation request.
mutation CreatePhotoCaptureRequest($request: PhotoCaptureRequest!) {
  createPhotoCaptureRequest(request: $request) {
    id
    photoCaptureUrl
    photoCaptureQrCode
  }
}
{
  "request": {
    "contractId": "<id of the contract to be issued>",
    "identityId": "<id of identity of recipient>"
  }
}
{
  "data": {
    "createPhotoCaptureRequest": {
      "id": "3eca057d-794c-4fdd-811f-b8a03a4f8567",
      "photoCaptureUrl": "https://instance.portal.verifiedorchestration.com/photo-capture/3eca057d-794c-4fdd-811f-b8a03a4f8567",
      "photoCaptureQrCode": "data:image/png;base64,iVBORw0...<base64 encoded image data>"
    }
  }
}
Photo capture completion
Photo capture progress can be monitored by either:
- Subscribing to the
photoCaptureEventsubscription. - Or, polling the
photoCaptureStatusquery.
subscription PhotoCaptureEvent($photoCaptureRequestId: UUID!) {
  photoCaptureEvent(photoCaptureRequestId: $photoCaptureRequestId) {
    status
  }
}
query PhotoCaptureStatus($photoCaptureRequestId: UUID!) {
  photoCaptureStatus(photoCaptureRequestId: $photoCaptureRequestId)
}
{
  "data": {
    "photoCaptureStatus": "complete"
  }
}